Long nardy strategy, from real games
Long nardy strategy rests on two things: the race and the block. There is no hitting, so the winner is whoever moves faster, or whoever shuts in the opponent's checkers and gains time. We analysed the last 800 long nardy matches on our site, and below are the mistakes, in real positions.
Point numbers are from White's side, as on the diagrams. White moves from the 24-point into its home, points 1–6. The notation 18/16 means a checker moved from the 18-point to the 16-point.
Where players go wrong most often
The site's analysis labels every move, from "Excellent move" to "Blunder". We ran the last 800 long nardy matches through it: 43,698 moves by people, with bot moves left out. The result: 13% of the moves where there was a choice were errors or blunders. In roughly one move in eight there was no choice at all: the move was forced, or there was no move.
| Moves of the game | Errors and blunders among moves with a choice |
|---|---|
| 1–6 | 13.4% |
| 7–12 | 18.8% |
| 13–18 | 20.1% |
| 19 and later | 8.5% |
The costliest stretch is moves 7 to 18: here one choice in five ends in a mistake. This is the middle game, when it is decided who builds a block and whose checkers get stuck. The opening is easier, since the first moves are almost forced. Below is what goes wrong.
The opening: spread your checkers
All 15 checkers start on the head, and they can leave it one per turn. Two things follow. First, don't spend your rolls running one checker far ahead while the rest stand still: bring out new ones. Second, put your checkers on different points. The wider they are spread, the more moves any roll gives you, and the less often you are forced into a move you don't want.
The exception is a first-turn 3-3, 4-4 or 6-6, when two checkers leave the head. The long nardy rules show exactly when that is allowed.
The block: your main weapon in long nardy
You cannot hit in long nardy. The only way to hinder your opponent is to take the points on their path. Several held points in a row make a block, or prime. A die shows at most 6, so a block of six points cannot be passed; but four or five points in a row already cut off most rolls. By the rules a six-point block is allowed only if at least one opposing checker is already in front of it.
It works both ways: build points in a row in front of your opponent's checkers, and don't let them finish a block in front of yours. Watch which points on your path are still free. While there are two or three gaps, you have time. When only one is left, act now, as the next roll may not give you the chance: a given number shows on at least one die in only 30.6% of rolls.
Back checkers: bring them out in time
A typical lost game looks like this: you are well ahead in the race, but two or three checkers sit in the far corner, and your opponent builds a block in front of them point by point. Here is a real example.
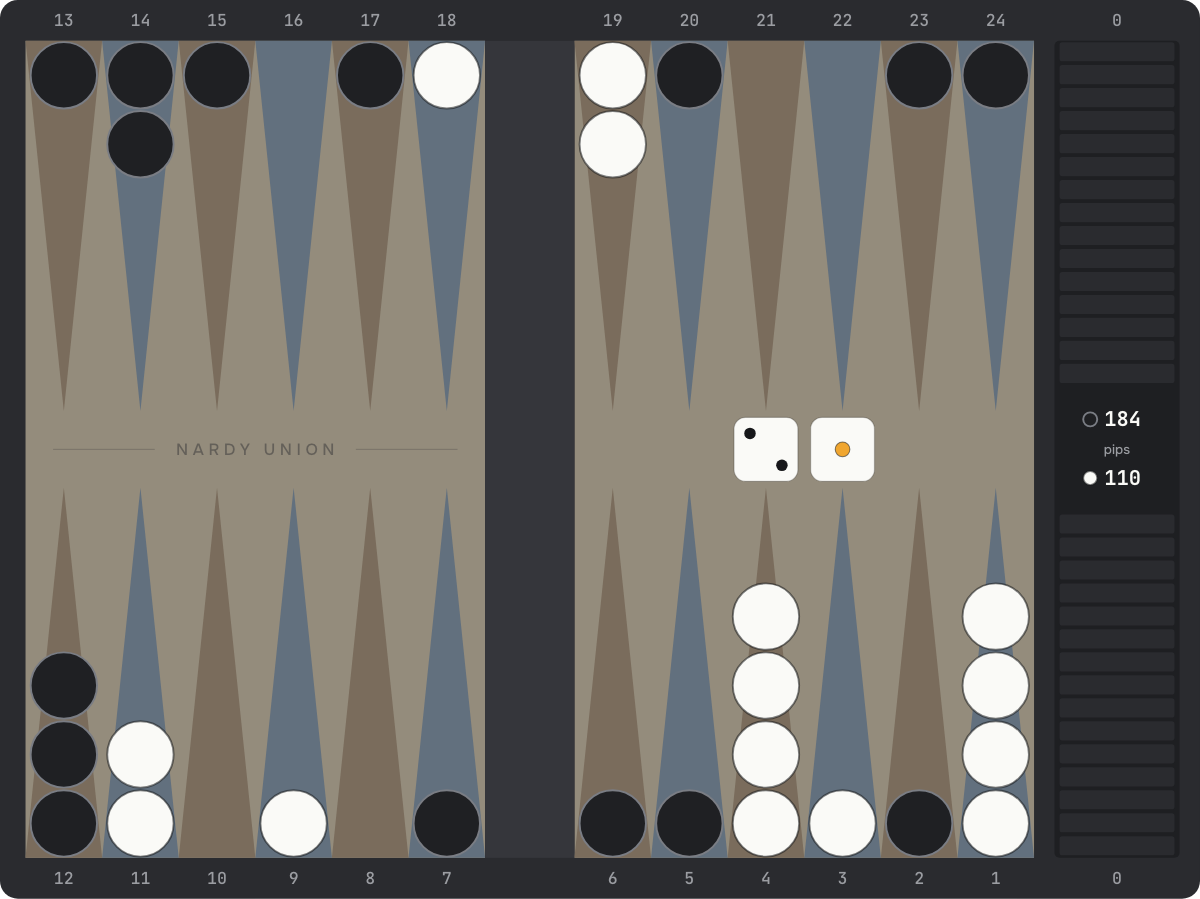
White leads the race by 74 pips, about nine rolls. But Black holds the 12-, 13-, 14-, 15- and 17-points. One black checker on the 16-point would be enough, and three white checkers could not get out until the block broke up: such a block is legal, since white checkers stand in front of it. White's 2-1 in the game was 11/10 3/1, shuffling checkers inside the home. A lead in the race means nothing if your back checkers never get home.
Don't bury your checkers
Points 1–3 are the end of White's path. A checker that lands there before bearing off does nothing more: it blocks no point on the opponent's path, and it can't make a move when you need one. The analysis finds this mistake again and again in the middle game.
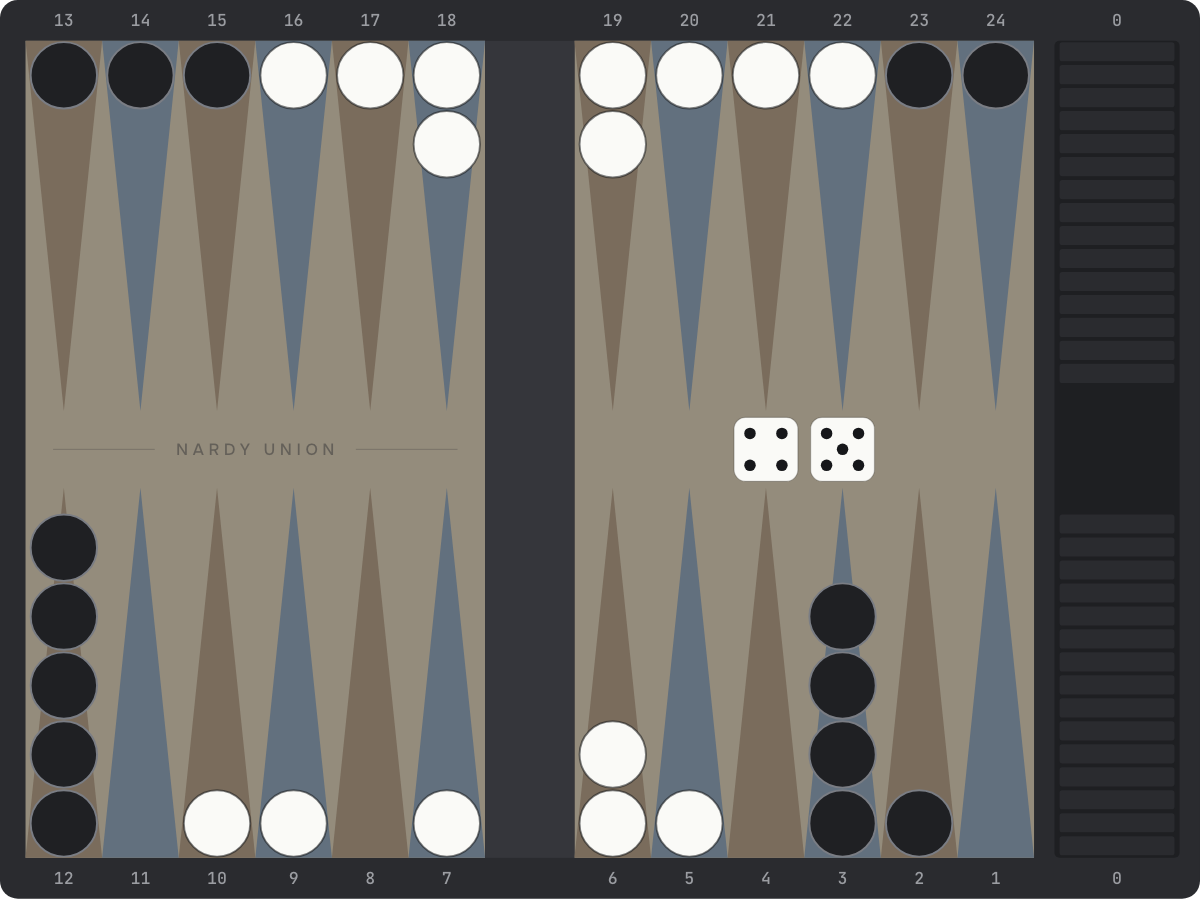
By the analysis, 6/1 cut White's winning chances from 84% to 59%. While the fight for points goes on, keep your checkers where they work: at the top of your home and on your opponent's path.
The race and the pip count
Your pip count is the total distance your checkers still have to travel. At the start each player has 360. A roll moves you 8.17 pips on average: doubles play four numbers and come up once in six rolls (16.7%). A gap of 20 pips is more than two rolls.
Comparing pip counts answers the main question of the middle game: are you in a race, or in a fight for position? If you are ahead, a straight race suits you: bring out your back checkers and go home by the shortest way. If you are behind, the race won't save you: hold points on your opponent's path and wait for a roll that forces them to open up. Our board shows the pip count, and so does every diagram in this article. The same idea decides short backgammon too, where hitting adds a second fight: see how to win at backgammon.
Doubles are strongest when you have somewhere to use all four moves, which is another reason to keep your checkers spread.
Bearing off: the game isn't won while a checker is left
You can bear off once all 15 checkers are home. After move 18 the share of mistakes drops to 8.5%, but these are the most painful ones. An example from a game between two players on the site:
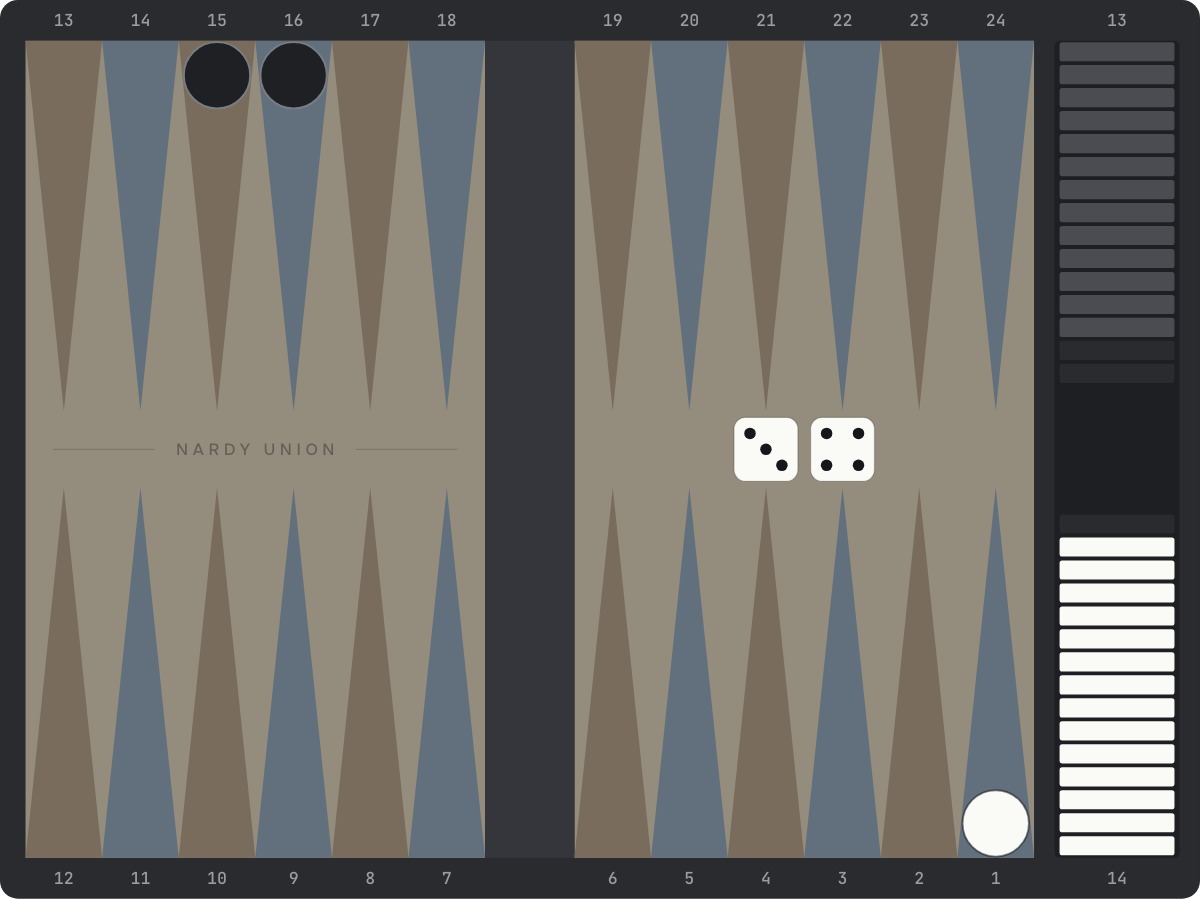
Black's home is points 13–18, and Black had checkers left on the 15- and 16-points. The 4 bore off the one on the 16-point, the 3 the one on the 15-point. Instead Black moved a checker inside the home and bore off only one. When bearing off, check first how many checkers the whole roll takes off, and only then think about rearranging.
How to learn strategy from your own games
Every game on the site can be opened in the analysis: it compares each of your moves with the strongest options it finds, counts what you lost in points and sums it up as a quality of play from 0 to 100. Every position in this article comes from such analyses. Play long nardy online, against a bot or a real opponent, and look at the analysis afterwards: your own mistakes stick better than anyone else's. If you are still learning, see how to play long nardy. The rules of both games are on the rules page.